> ## Documentation Index
> Fetch the complete documentation index at: https://docs.kashimi.tech/llms.txt
> Use this file to discover all available pages before exploring further.
# Custom Bank Selection
> Integration where you fetch the provider list, build your own bank selection UI, and pass the selected provider ID to initiate a payment.
In the custom bank selection flow, your application fetches the list of available banks, renders your own bank selection UI, and passes the selected provider ID when initiating the payment. Kashimi then returns a redirect URL and handles the rest of the authorisation flow with the bank.
 ## How it works
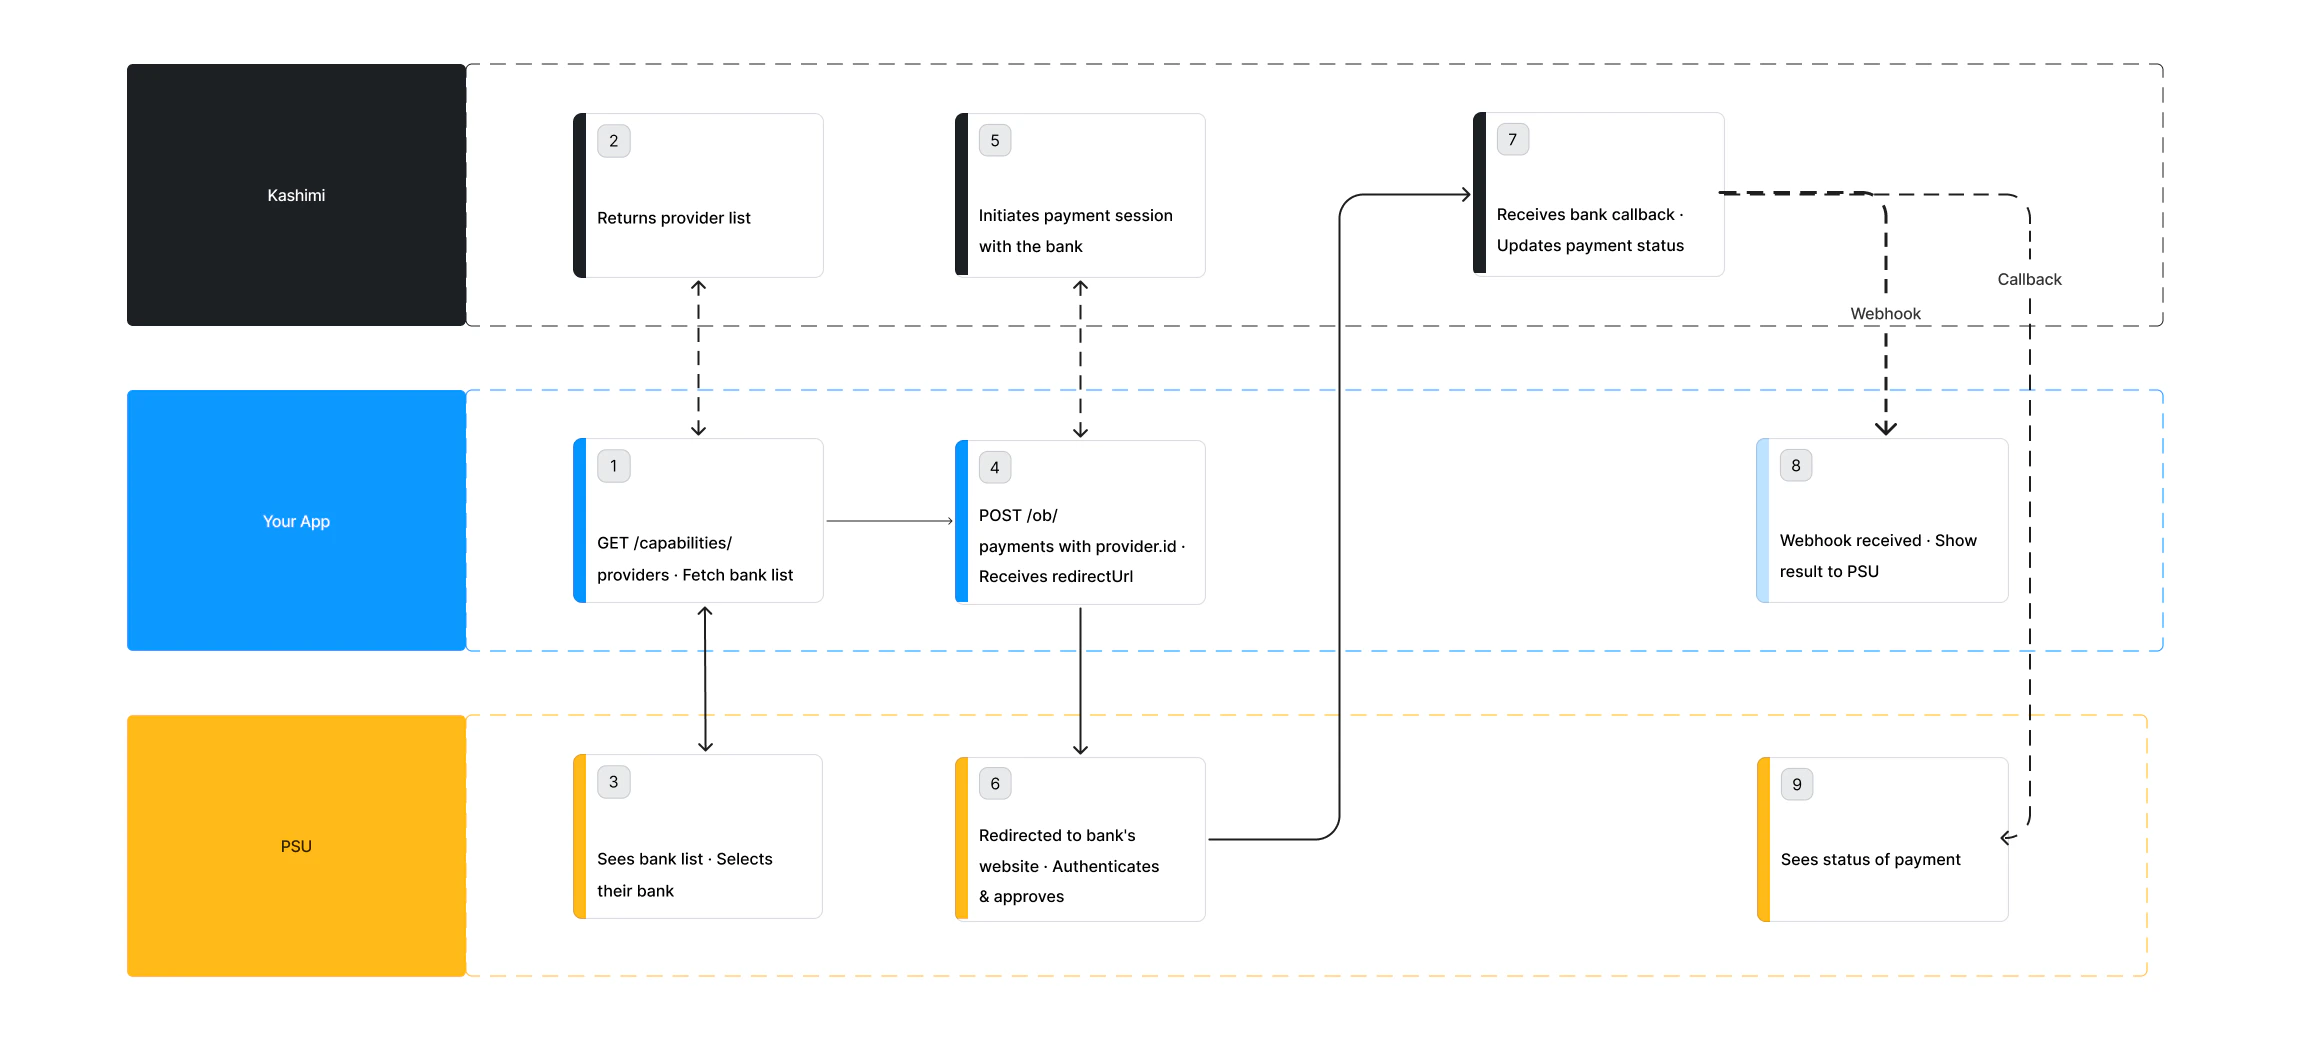
Call [GET /capabilities/providers](/api-reference/endpoint/banks) to retrieve the list of available banks. Use this to build your bank selection UI — display names, logos, and filter by country or payment scheme as needed.
Once the PSU selects a bank, call [POST /ob/payments](/api-reference/endpoint/initiatePayments) with the selected `provider.Id` and payment details. Kashimi returns a `redirectUrl`.
```json Request theme={null}
{
"provider": {
"id": "123e4567-e89b-12d3-a456-426614174000"
},
"paymentScheme": {
"name": "SEPA",
"preferences": { "mode": "INSTANT" }
},
"sender": {
"account": {
"number": {
"type": "IBAN",
"value": "DE89370400440532013000"
},
"currency": "EUR"
},
"address": {
"country": "NL",
"city": "Amsterdam",
"streetName": "Damstraat",
"buildingNumber": "1A",
"postCode": "1012AB"
},
},
"recipient": {
"account": {
"number": {
"type": "IBAN",
"value": "DE89370400440532013000"
}
},
"name": "John Doe",
"address": {
"country": "NL",
"city": "Amsterdam",
"streetName": "Damstraat",
"buildingNumber": "1A",
"postCode": "1012AB"
}
},
"amount": 10,
"currency": "EUR",
"remittanceInformation": {
"type": "UNSTRUCTURED",
"value": "Invoice1234567890"
},
"metadata": {
"redirectUri": "https://yourapp.com/payment/callback",
"psuIpAddress": "84.240.80.120",
"psuUserAgent": "Mozilla/5.0 (Windows NT 10.0; Win64; x64) AppleWebKit/537.36",
"endToEndId": "123456789123456789",
"webhookUrl": "https://yourapp.com/webhooks/kashimi"
}
}
```
```json Response theme={null}
{
"paymentId": "56caec01-85cc-4fc6-8080-cc0f7ed03a7e",
"redirectUrl": "https://bank.example.com/auth?paymentId=xyz",
"createdAt": "2026-04-16T10:00:00.000Z",
"updatedAt": "2026-04-16T10:00:00.000Z",
"status": "PENDING"
}
```
Send the PSU to the `redirectUrl`. They will authenticate and approve the payment on their bank's website. Show a loading screen while they are away.
After approval or rejection, the bank redirects the PSU back to Kashimi and back to your `callbackUrl`. Do not assume success at this point — always verify the actual status.
Poll [GET /payment-statuses/latest](/api-reference/endpoint/latestPaymentStatus) or receive a webhook. Show a success screen only once `status` is `COMPLETED`.
***
## Full payment flow
The complete experience varies by bank. Most banks use a redirect flow; some use an embedded flow where credentials are collected in your UI.
## How it works
Call [GET /capabilities/providers](/api-reference/endpoint/banks) to retrieve the list of available banks. Use this to build your bank selection UI — display names, logos, and filter by country or payment scheme as needed.
Once the PSU selects a bank, call [POST /ob/payments](/api-reference/endpoint/initiatePayments) with the selected `provider.Id` and payment details. Kashimi returns a `redirectUrl`.
```json Request theme={null}
{
"provider": {
"id": "123e4567-e89b-12d3-a456-426614174000"
},
"paymentScheme": {
"name": "SEPA",
"preferences": { "mode": "INSTANT" }
},
"sender": {
"account": {
"number": {
"type": "IBAN",
"value": "DE89370400440532013000"
},
"currency": "EUR"
},
"address": {
"country": "NL",
"city": "Amsterdam",
"streetName": "Damstraat",
"buildingNumber": "1A",
"postCode": "1012AB"
},
},
"recipient": {
"account": {
"number": {
"type": "IBAN",
"value": "DE89370400440532013000"
}
},
"name": "John Doe",
"address": {
"country": "NL",
"city": "Amsterdam",
"streetName": "Damstraat",
"buildingNumber": "1A",
"postCode": "1012AB"
}
},
"amount": 10,
"currency": "EUR",
"remittanceInformation": {
"type": "UNSTRUCTURED",
"value": "Invoice1234567890"
},
"metadata": {
"redirectUri": "https://yourapp.com/payment/callback",
"psuIpAddress": "84.240.80.120",
"psuUserAgent": "Mozilla/5.0 (Windows NT 10.0; Win64; x64) AppleWebKit/537.36",
"endToEndId": "123456789123456789",
"webhookUrl": "https://yourapp.com/webhooks/kashimi"
}
}
```
```json Response theme={null}
{
"paymentId": "56caec01-85cc-4fc6-8080-cc0f7ed03a7e",
"redirectUrl": "https://bank.example.com/auth?paymentId=xyz",
"createdAt": "2026-04-16T10:00:00.000Z",
"updatedAt": "2026-04-16T10:00:00.000Z",
"status": "PENDING"
}
```
Send the PSU to the `redirectUrl`. They will authenticate and approve the payment on their bank's website. Show a loading screen while they are away.
After approval or rejection, the bank redirects the PSU back to Kashimi and back to your `callbackUrl`. Do not assume success at this point — always verify the actual status.
Poll [GET /payment-statuses/latest](/api-reference/endpoint/latestPaymentStatus) or receive a webhook. Show a success screen only once `status` is `COMPLETED`.
***
## Full payment flow
The complete experience varies by bank. Most banks use a redirect flow; some use an embedded flow where credentials are collected in your UI.
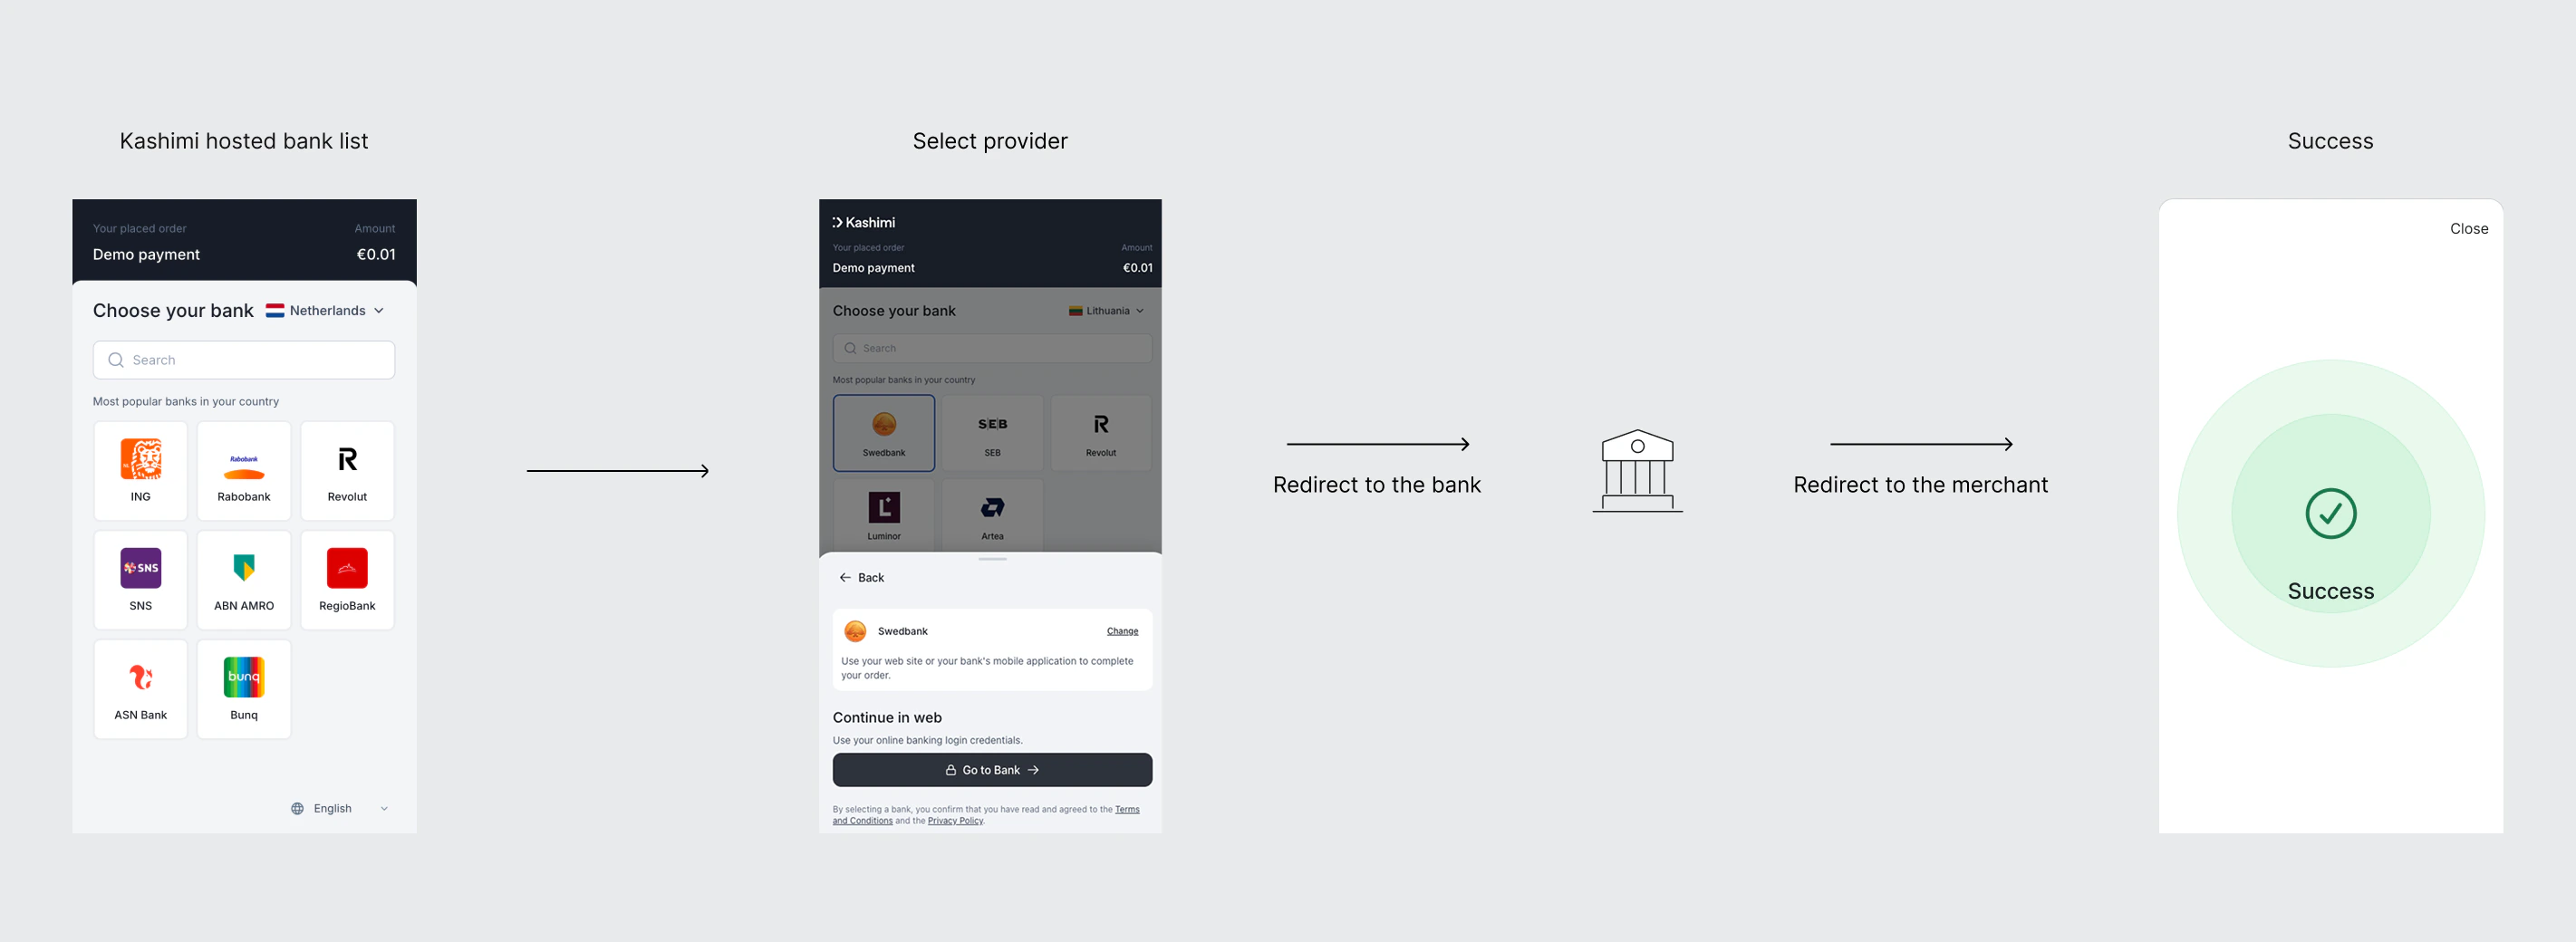 The PSU selects their bank in your UI, is redirected to the bank's website or app to authenticate and approve the payment, then returns to your `redirectUri`. You confirm the final status via webhook or status poll.
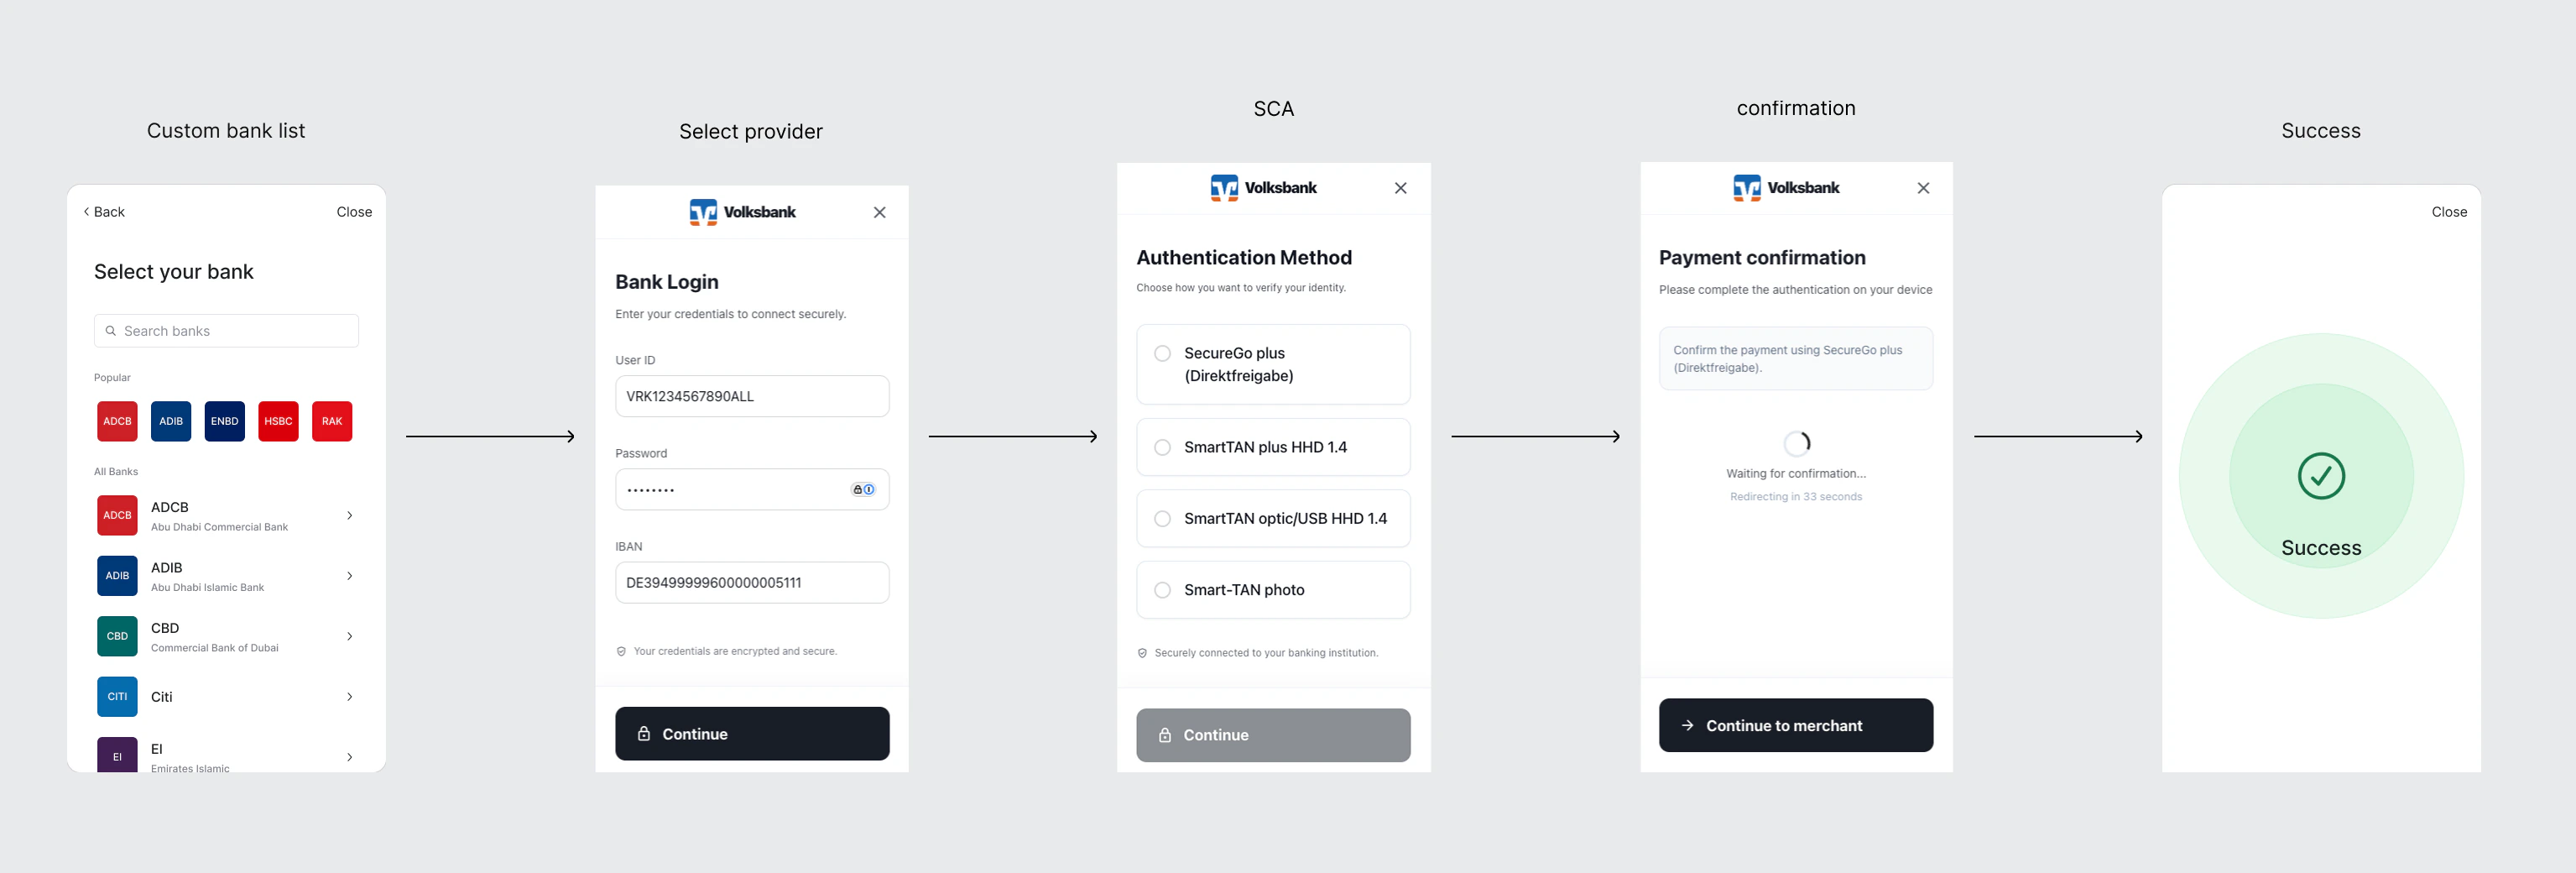 For banks where `SENDER_PROVIDER_CREDENTIALS_PASSWORD` is present in `requiredPaymentFields`, you can optionally collect the PSU's credentials in your own UI and include them in the payment request. There is no redirect to the bank's website — the full flow stays within your application.
If you choose not to collect them upfront, Kashimi will display its own UI screen mid-flow to prompt the PSU for the missing credentials.
Never log, store, or cache credentials. Use HTTPS only. Clear credential values from memory immediately after the request is sent.
For banks where `SENDER_PROVIDER_CREDENTIALS_PASSWORD` is present in `requiredPaymentFields`, you can optionally collect the PSU's credentials in your own UI and include them in the payment request. There is no redirect to the bank's website — the full flow stays within your application.
If you choose not to collect them upfront, Kashimi will display its own UI screen mid-flow to prompt the PSU for the missing credentials.
Never log, store, or cache credentials. Use HTTPS only. Clear credential values from memory immediately after the request is sent.